Connect MySQL Server on Ubuntu to MySQL Workbench on Windows

To get MySql Community Server hosted on Ubuntu to get connected to my MySQL Workbench installed on Windows 10, here are the things that I did to connect via TCP/IP which was also useful for me to connect to MySQL via my code:

Step 1:Changing the bind address in MyMySQL
On the Ubuntu machine (where my MySQL Community Server is installed) using Putty, I changed the mysqld.cnf file with the command “sudo nano /etc/mysql/mysql.conf.d/mysqld.cnf”. Using arrow keys, I scrolled down to the row with “bind-address” and I changed it from “127.0.0.1” to “0.0.0.0”. I used ctrl+x to close and entered “Y” to save the file.

Step 2: Restart the MySQL Server
You have to restart the MySQL server. To do that, you can restart using the command “sudo service mysql restart”. If you are unable to restart, kill MySQL Process. First find the Process ID of MySQL using “ps ax | grep mysql” then kill the process using “sudo kill [process_id]”

Step 3:Changing the Firewall Settings of Ubuntu
To allow outside connections, you should change the settings of the firewall. I used UFW (Uncomplicated FireWall) to change the settings. Start the UFW if it is not yet enabled using the command “sudo ufw enable”. Check the status using “sudo ufw status”. Now, enable connections to the MySql port 3306 (default) from a particular IP address using the command “sudo ufw allow from [ip_address] to any port 3306” or you can allow all connections to the port from any IP address is your IP address keeps changing using the command “sudo ufw allow mysql”

Step 4: Creating a user in MySQL
I created a user in MySQL to avoid logging in using the root using the command “CREATE USER ‘user_name’@’your_IP_Address’ IDENTIFIED BY ‘password’;

Step 5: Connect via the MySQL workbench

  1. Click Database
  2. Click Connect to Database
  3. In the Connection Method field, select “Standard TCP/IP”
  4. In the Hostname, enter your server IP address
  5. In the Server Port, leave as it is “3306” unless you have changed the port of MySql in your server
  6. In the Username, enter your server user name
  7. In the Password, enter your server password
  8. Click Ok

Step 6: If you are still not able to connect

  1. On your server, disable the firewall and check if you are able to connect
  2. If you are able to connect, reset the firewall with the command “sudo ufw reset” (Make sure you take a copy or screenshot of all the connections in the firewall. You can get all the ports with the command “sudo ufw status”). If you are unable to connect go to step 9.
  3. Now allow each and every port that was earlier present with the command “sudo ufw allow 80”, “sudo ufw allow mysql”, etc.
  4. Disable and enable the firewall using the commands “sudo ufw disable” and “sudo ufw enable” respectively.
  5. Check if you are able to connect via the workbench
  6. If you are still not able to connect, just restart the server using the command “sudo reboot”
  7. Once the reboot is complete, you should be able to connect to the MySQL server.
  8. If you are still not able to connect, use something like nmap software to check for all the open ports and see if you can see 3306. If you can’t see the port, you have to debug what is stopping the firewall from blocking your MySQL connections.
  9. Check your MySQL privileges with the command “show grants for ‘user_name’@’localhost’;”. If you are able to see the grants, that means your IP address is not allowed. Try to update the grants with your IP address with the following command “GRANT ALL PRIVILEGES ON database.* TO ‘user’@’yourremotehost’ IDENTIFIED BY ‘newpassword’;” or GRANT ALL PRIVILEGES ON database.* TO ‘user’@’yourremotehost’ IDENTIFIED BY ‘newpassword’; (To allow connections from everywhere)

If the above steps don’t work and still you want to connect via a quick hack
Premium Hack Step: Logging in using MySQL Workbench via SSH

  1. Click Database
  2. Click Connect to Database
  3. In the Connection Method field, select “Standard TCP/IP over SSH”
  4. In the SSH Hostname, enter your server IP address
  5. In the SSH Username, enter your server user name
  6. In the SSH Password, enter your server password
  7. In the SSH Key file, don’t do anything
  8. In the MySQL Hostname, leave it as it is “127.0.0.1”
  9. In the Server Port, leave as it is “3306” unless you have changed the port of MySQL in your server
  10. In the Username, enter your MySQL username that you created in the previous step
  11. In the Password, enter your MySQL password that you created in the previous step
  12. Click Ok
    Now, you should be able to enter your MySQL Workbench

Other useful commands:

  1. To check if MySQL is running: systemctl status mysql
  2. Entering MySQL: sudo mysql -u [username] -p (Default username is root and password is nothing (just press enter key))
  3. To check the status of ufw: sudo ufw status
  4. To check the ufw status numbered for deleting a port access: sudo ufw status numbered
  5. To delete a ufw port access: sudo ufw delete [number_of_the_port_to_be_deleted_from_previous_command]
  6. To start MySQL service: sudo service mysql start
  7. To update all packages: sudo apt update
  8. To uninstall MySQL: sudo apt-get remove mysql*
  9. To install MySQL
    Step 1: sudo apt update
    Step 2: sudo apt install mysql-server
    Step 3: sudo systemctl start mysql.service
    Step 4 (if something is broken during installation): sudo apt –fix-broken install
Posted in Uncategorized | Leave a comment

Free Data Recovery Software

I had a problem reading SD Card on my HP and Mac Laptops. The SD card had a lot of important pictures of my family. I wanted my photos desperately. I had more than 30 GB of data to be recovered.

I tried researching free recovery software but the internet search is full of paid and SEO optimized paid software links.

Most of the freemium software were capping the recovery limit to 500 MB or less. I couldn’t muster the courage to give my credit card details to any of these companies to buy the premium versions as the companies were not reputable. They looked more like marketing gimmicks than trustworthy software vendors.

After spending more than 6 hours researching and experimenting with various software, I found a perfect solution in Quora. One of the contributors recommended TestDisk and PhotoRec Open Source Software to recover the data. The software worked perfectly. Both the software are from the same vendor. Here is the link:

https://www.cgsecurity.org/wiki/TestDisk

I tried multiple methods such as:
a. CHKDSK /r e: or CHKDSK /f e:– This method didn’t work even in administrator and safe mode. It continuously gave me the following error:

The type of the file system is RAW.
CHKDSK is not available for RAW drives.

If the above command works for you, then that is the best solution. If it doesn’t then, the best solution to recover the data is use the TestDisk or PhotoRec

b. Disk Drill by Pandora Software: This has an easy to use interface but the sofware caps the recovery limit to 500 MB. I needed more than 30 GB to be recovered.

c. ZAR X: I tried ZAR X as I read that recovering photos is free. After the installation, the software also said that recovering photos is free. After running ZAR X for couple of hours to recover the photos on my SD Card, it showed the list of all the pictures. I could recover only few pictures using this software which were in RAW part of the disk. But when I tried to recover the pictures in FAT32 part of the disk, the program ended abruptly. I thought the program might have ended due to memory issues. Then I ran the full scan again for 2 hours. This time, I tried recovering only one folder. Again same problem, the program ended abruptly. Then I decided to check other options in the program. There was an option to create a virtual disk image. I created that image which took lesser time than earlier full scan. This time I tried exporting only 1 image. Again program ended abruptly. I loaded the disk image using ZAR as the virtual disk was not loading in any other loader. The image loaded in just few minutes but the exporting of images was a failure. Then I concluded that ZAR X doesn’t work unless I have the full license. The developer might not have done the coding properly to handle the license issues. Overall, it was a fruitless effort of more than 4 hours.

d: Recuva: The last option that I tried before TestDisk is Recuva. I failed to even identify the corrupted disk.

In conclusion, my effort trying all the freemium software was not worth it as the prices were too high. Also, windows repair tool CHKDSK also didn’t work for me. I would recommend TestDisk and PhotoRec software to recover the data from you RAW/corrupted drives.

Posted in Uncategorized | Leave a comment

Handling XML Verification Failed Error on Mac while installing packages in Android SDK and AVD Manager

Error: XML verification failed for https://dlssl.google.com/android/repository/repository.xml. Error: java.lang.NullPointerException Solution: This error occurs on Mac because, Java 6 is not installed by default on osX 10.5.6 or before and you need Java 6 to run Android AVD and SDK Manager. The … Continue reading

More Galleries | Tagged , , , | Leave a comment

‘EVM activist Hari Prasad is a hero, not a thief’

Best article ever on EVMs and Hari Krishna Prasad

What wrong has he committed? He is the general manager of a reputed firm in Hyderabad and has been an activist involved in this movement since the very beginning. He has the best interest of the country in mind. Consider that Hari Prasad has not entertained a single offer to tamper with an EVM from politicians. Politicians from the northeast offered lucrative sums to learn how to tamper with the EVMs but they were rejected. It is a matter of shame and travesty of justice that the Election Commission instead of appreciating the acts of such heroes should stoop to intimidation and try and punish them.

Hari Prasad’s actions are similar to those of activists in US and Europe and they are respected for it. For instance, Dr Alex Halderman who worked with Hari Prasad in hacking the Indian EVM has also hacked a EVM used in the US elections and he was employed by State of California Secretary of State to expose the vulnerabilities of the EVMs used in California.

Read the complete article: http://news.rediff.com/interview/2010/aug/24/
hari-prasad-is-a-hero-not-a-thief.htm

-Viplav

Posted in Uncategorized | Tagged , , | Leave a comment

Finally what did Mr. Hari Krishna Prasad get by trying to prove that Electronic Voting Machines are vulnerable to tampering?

A tag name called “thief” and investigation by IB (Intelligence Bureau) and RAW (Research and Analysis Wing, India’s secret intelligence service)

It makes clear in the minds of common people that all the charges are clearly orchestrated. Central Government is opposing his suggestions because they are under the purview that Mr. Hari Krishna Prasad is raising his voice against them, which is a fallacy.  Whereas Mr. Hari Krishna Prasad is trying to prove that the Electronic Voting Machines have many loopholes through which they can be tampered.  His campaign is not against any particular party or government.  As a responsible citizen of India, he want to make sure that the Indian Democracy is free and fair, and nobody is taking undue advantage of the loopholes.

To support Hari Krishna Prasad, raise your voice by voting here and at indianevm.com:

I request all the technologists and responsible citizens of India to join their voice together for the release of Mr. Hari Krishna Prasad and make the Election Commission implement his suggestions for a better democracy.

If any further pressure is put on Hari Krishna Prasad, this would directly imply that the ruling government doesn’t want the machines be rectified out of loopholes or they are trying the suppress the voice of genuine researchers working for the betterment of our nation.

Important Links:

http://indiaevm.org

http://indianevm.com

https://luckyviplav.wordpress.com

Important Articles which you should definitely read:

http://timesofindia.indiatimes.com/india/Intel-background-check-on-EVM-thief/articleshow/6441674.cms

Imporant Videos

http://ibnlive.in.com/videos/129592/can-electronic-voting-machines-be-fixed.html

http://www.timesnow.tv/videoshow/4352444.cms

Regards,

Viplav

Posted in Legal, Politics, Technology | Tagged , , , , | Leave a comment

Is arrest an answer for common citizen in India?

Is arrest an answer for common citizen in India for raising his voice against the vulnerability of our democracy for tampering, through Electronic Voting Machines (EVMs)?

Is this what responsible technologists get for using their skills for a better nation?

Raise your voice by supporting this concern:

Yes, in India arrest is the only answer if you are a normal citizen and if you raise your voice against any vulnerability, which challenges the politically backed bureaucratic system.

Mr. Hari Krishna Prasad, an ordinary technologist from Hyderabad was arrested on Saturday morning from his home for demonstrating the vulnerability of EVMs to tampering.

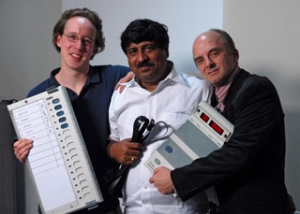
Dr. J.Alex Halderman, Mr.Hari Krishna Prasad and Mr.Rop Gonggrijp

Dr. J.Alex Halderman, Mr.Hari Krishna Prasad and Mr.Rop Gonggrijp

Mr. Hari Krishna Prasad with Dr. J. Alex Halderman, a professor of computer science at the University of Michigan and Mr.Rop Gonggrijp, a technology activist from Holland, conducted a thorough research on the vulnerabilities of Indian Voting Machines to tampering.  The team was successful in establishing multiple techniques to hack or tamper our Indian Electronic Voting Machines, which we use in all our elections.  These voting machines play a crucial role in deciding which government is formed.  If these machines can be tampered, are we assured that the vote we cast, is cast for the right government in the world’s largest democracy?

I request all the citizens of India and activists from the world to raise their voice against the arrest of Mr. Hari Krishna Prasad and promote a tamper proof democracy.

Let us not go back on technology; let us make it accountable through:

Electronic Voting Machine (Open Source) + Paper Receipt = Safe Democracy

Research Paper and Video:

http://indiaevm.org/

This paper authored by Mr.Hari Krishna Prasad, Dr. J.Alex Halderman and Mr.Rop Gonggrijp, has topped the list of papers submitted at 17th ACM Conference on Computers and Communications Security.  Industry leaders like Microsoft Research, Google, IBM Research, US Army Research Office and Others back this program.

http://www.sigsac.org/ccs/CCS2010/paper_list.shtml

Noted Articles and Blogs:

http://www.indianevm.com/blogs/?p=402

http://www.freedom-to-tinker.com/blog/felten/indias-electronic-voting-machines-have-security-problems

http://news.ycombinator.com/item?id=1624307

http://boingboing.net/2010/05/06/indias-e-voting-mach.html

http://groups.google.com/group/soc.culture.indian/browse_thread/thread/314afa78f34f4c92

http://www.bbc.co.uk/news/10123478

Last Conversation with Hari Prasad (Audio File)

http://www.youtube.com/watch?v=rKTSW-CA_x0

Posted in Legal, Politics, Technology | Tagged , , | Leave a comment

Windows 7 on Mac OS X through Virtual Box

Using Windows 7 installed in a Bootcamp partition from Mac OS X simultaneously

This guide will help you set up access to your Windows 7 installation directly from Mac OS X.  You can follow this simple guide without technical knowledge and get your Windows 7 Virtual Box, up and running without any hassle.  What all you need to do is, “Follow the guide blindly”.

Software Required: Virtual Box 3.2.6 or later

Time Required: 30 mins

Things we will do in this guide:

  1. Prepare the Mac system for installation
  2. Configure Virtual Box for the first boot
  3. Install Virtual Box Guest Additions for seamless full screen usage
  4. Install Audio Drivers in Windows 7
  5. Use connected USB Devices in Windows 7
  6. Setup Shared Folder between Mac and Windows 7 and access it
  7. FAQs
    1. Virtual Box Errors
    2. Fatal: No Bootable Medium Found! System Halted.
    3. Windows “Blue Screen of Death”
  8. References

Read the complete post 

Posted in Technology | Tagged , , , | 66 Comments

Hello world!

Welcome to WordPress.com. This is your first post. Edit or delete it and start blogging!

Posted in Uncategorized | 4 Comments